
Note: Some affiliate links may be used in this post. I may receive a small commission, at no extra cost to you, if you use my affiliate link. Thanks for supporting this site. Full disclosure policy here.

Let’s talk about brush care.
Help your brushes to help you.
A good paintbrush is a joy to use. That immensely satisfying sweep of colour, or the finest line from a beautiful tip. So it pays to look after our brushes, keeping them in tip-top condition for as long as possible.
We’ve already looked at brush storage in a previous post, so now let’s look at how to care for our brushes before we put them away. Doing so improves your painting experience and saves you having to replace a brush earlier than necessary.
Dos and don’ts of brush care
The first thing to do is to cherish your brushes. I’ve been teaching art for decades, and I’ve noticed a whole host of issues that have a direct impact on a brush’s performance and longevity. So that means, if you’re guilty of any of these: please STOP!
Don’t
- Keep using it when it’s plainly past its best. I’m especially thinking watercolour here. That beautiful tip that gave such fine lines just doesn’t quite do it any more. You’ve tried cleaning and re-shaping, but that’s still not enough. Time for a new brush. I recommend these if your budget will stretch to it, or these are a slightly more affordable option. Both are superb.
- Throw it away – some old and worn brushes make fantastic marks that a new one just can’t. So don’t discard them. They’re worth keeping to bring texture and liveliness to particular areas of your paintings. I use an old hogs hair brush for creating fur texture. The worn and splayed bristles make it perfect for that purpose.
- Give it to a child. When I worked in art education we were often donated art materials that the giver had inherited. Usually brushes that had been used for oils and were worn down and hadn’t been cleaned in decades. I applaud the wish to encourage the next generation of artists, but if an adult can’t make it work, how do we expect a child to do so? If you would like to encourage upcoming artists, helping at your local school or donating to the fabulous charity Arts Emergency are great ways to do just that.
- Clean the dust off your tech. OK, guilty as charged. I do this, but only with an old soft brush that’s proven useless for anything else. And that’s all I use it for.
- Scrub with it. Unless it’s an old brush used for scumbling technique for oils and acrylics. Seeing someone scrubbing a sable brush back and forth has me stifling screams.
- Use it for anything other than fine art e.g. painting the fiddly bits when decorating, creosoting the fence, make up, cake decorating…. In the years I’ve been teaching I’ve heard of my students doing all of those and more. And don’t tell anyone, but I used to hide the best watercolour brushes from other staff members!
- Use it for both oils and water-based media. You’re at risk of ruining your painting through cross contamination. Oil and water don’t mix, so a slick of residual oil on your acrylic or watercolour can ruin the whole painting. Keep separate sets of brushes, if at all possible.
- Let paint dry on it. Less of an issue with watercolour or gouache than other media, but a habit it’s best to avoid. Doing so with acrylic can spell the end for your brush. anyway, how would you like to go without a wash at the end of your day?
- Put it in your mouth or lick it. Eeew! Paints are much safer these days than historically, but they are still chemicals that you wouldn’t want to eat. Putting anything that’s been touching cadmium in your mouth is a definite no. (Find cadmium-free paints here.) Van Gogh used to put his paintbrushes in his mouth, and look what happened to him! His paints were lead-based, and lead poisoning has a proven negative affect on mental health.
- Stand it on its bristles in a water pot. This is my biggest gripe with paintbrush abuse, and one I often see from students. How would you like to be left upside down in a bucket of water? Well, your favourite brush doesn’t like it either. Why not? Because water seeps into the wooden handle, which expands and cracks the varnish. The varnish flakes off until you’re left with a plain wooden handle and a loose ferrule. It also spoils the tip and causes the bristles to bend out of shape. Let’s get out of that habit, pleeeeease. I’m beseeching you.

So that’s got the negative stuff out of the way. Let’s look at some good habits instead.
Do
- Discard the protective tube that covers the bristles of a new brush. It’s only for the initial protection in transit, not for repeated use. Tightly covering damp brush hairs encourages mould. Yuk! Let your brushes breathe.
- Rinse a new brush before use. This will remove the protective Gum Arabic the manufacturer applied.
- Use an older brush or a knife to mix your paints, and keep the newer brushes for applying paint. This will protect that all-important tip, especially with natural hair watercolour brushes.
- Clean your brush regularly. We’ll come on to how to do that in a minute.
- Give your brushes a periodic clean with a good brush cleaner. Even if you’re careful to clean your brush as you use it, over time paint can build up and bristles can become stained. Using a good brush cleaner can revitalise your brush and bring it back to an almost-new condition.
- Use a brush cleaner if you’ve accidently allowed acrylic or oil paint to dry on your brush. Even if your brush is rock hard with paint residue, a good brush cleaner will bring it back to life. I use The Masters Brush Cleaner and Preserver, which looks similar to soap, and has saved many a brush over the years. Simply dampen the brush, work the cleaner into the bristles (right down to the ferrule), and then rinse. Repeat until the lather is uncoloured by paint and the bristle are back to their usual condition.
- Clean and condition your brushes if you know you won’t be using them for a while. Off on holiday? Busy on a different project? Sometimes life gets in the way of our painting. Clean your brushes with brush cleaner, but reshape and allow the cleaner to dry on the bristles. It will help protect the bristles until you’re ready to paint again. Then just rinse them off, and you’re good to go.
- Reshape your brushes after use. Once you’ve finished your painting session, clean and reshape the brush. The bristles will dry in their perfect shape, and you’ll be pleased you took the trouble when you come to use the brush next time.
- Use water to clean an acrylic brush. Some brushes are designed for use with acrylics, but their shape and spring would make them great for oils. Beware though, cleaning with a solvent can dissolve the glue that hold the bristles in place, resulting in major fall-out. Liquitex paddle brushes are a good example of this. They’re wonderful brushes, but always clean them with water.
- Flick your brush to re-shape it. A beautiful sable or along-bristled sword-liner can be reshaped, while the bristles are wet, by holding the end of the handle and giving a sharp flick of the wrist. The bristle will naturally revert to the original shape, without the need to reshape with your fingers.
- Reshape a synthetic brush by holding it in a cup of boiling water for just 30 seconds.
- Store your brushes upright with the bristles pointing upwards, while you’re not using them. Once thoroughly dry you can store them in a case.
- Store brushes away from direct sunlight and extremes of temperature.
- Teach children how to care for their brushes. It’s so much easier to learn a new habit from the outset than it is to break a bad one.
How to clean a paintbrush
First wipe off any excess paint off the brush onto a newspaper or rag. Now give it a good swish around in water (or your cleaning medium, if you’re using oils). Check, by wiping the brush on a clean piece of kitchen roll, that there’s no paint clinging to the bristles. Wash again if necessary, making sure the bristles are clean right down to the ferrule. Now you’re ready for fresh, clean colour.
If the bristles are still stained or have dried paint after washing, use a brush cleaner such as the The Masters Brush Cleaner and Preserver.
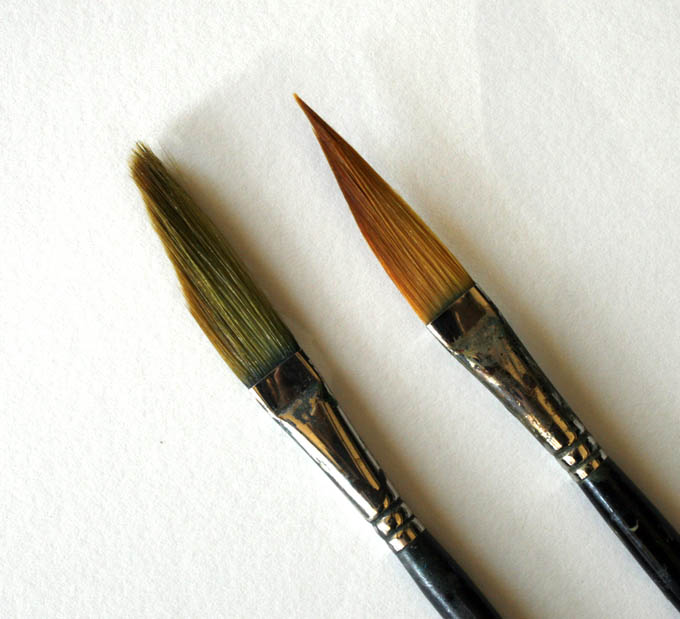
Two synthetic sword-liner brushes, similar in age, usage and scruffiness. Same brand, same range, same size.
The one on the right has been cleaned with brush cleaner. The other obviously hasn’t.
As you can see, taking care of your brushes pays dividends. A cherished brush performs better and lasts longer, making your painting experience more enjoyable and costing you less. What’s not to love?
It’s just about getting into good habits, and knowing how to make amends when the occasional disaster strikes. A ruined brush definitely counts as a disaster in my opinion, especially if it’s a favourite.
So I hope this post has been helpful, and will encourage you to look after your brushes. Your paintings will thank you.
Related Posts
- Need a brush case? Here are my thoughts on the best ones. Solving The Case of Brush Storage
- Liquitex Paddle Brushes – Review
- Liquitex Pen Cleaner – Product Review
Know someone who might benefit from this post? Please share.

Dear Jackie
Just to say a massive thank you for your blog! I so look forward to receiving it! So Informative and Interesting! It is certainly appreciated by myself.
The last ‘blog’ about textures was so timely. I set up a weekly ‘paint and chat’ ZOOM session for our Exmouth Art Group (Devon) at the beginning of Lockdown…. Gosh nearly a year ago now…it has been a lifesaver and motivational, supported members who felt isolated and encouraged them to paint and feel a sense of camaraderie again! Members could also contribute and share an area of enthusiasm or technique. I was demonstrating some seascape textures last week. Your blog was excellent and I was able to share your link. Thank you.
Best Wishes and take care.
Margot 🙂
Hi Margot.
Lovely to hear from you. I’m so glad you like my blog and find it useful. Thank for sharing the link.
Well done for organising your “Paint and Chat” sessions for Exmouth Art Group. I’m sure a lot of members will have benefitted hugely from your efforts. I remember having a very enjoyable day with your group, so do give them my best wishes. Hopefully things will soon be back to normal and in-person art group meetings can start again.
Best wishes,
Jackie
Good info and detail!
I bought a brush at a second hand store to use for outdoor projects where it might end up getting abused a bit. After it was cleaned up, it was really nice, so I decided to keep it with my “good” brushes. But then I noticed, there must have been a hollow inside the ferrule that was retaining anything the brush had in it; paint, cleaner, whatever. It kept seeping out through the bristles. I cleaned that brush so many times!
Finally, getting out the “big guns,” I swished it in a solvent/oil based brush cleaner, and that got the last of the paint residue out of it that had kept seeping out, but now it was seeping oily brush cleaner!
After several baths in rubbing alcohol it still wasn’t degreased. I paint in acrylics, so I definitely didn’t want an oily brush.
So…I washed it again in Masters brush soap, the solid water based soap cleaner that comes in a tub, lathered the heck out of it for the umpteenth time, and let the lather dry in the brush, (with the bristles shaped correctly). It dried for about a day, before I rinsed it out and washed it again in Masters. Improvement, finally.
It is still not perfect, so I reluctantly put it with the “outdoor” brushes. Now I know, though, why its former owner gave it to a second hand store! 😀 Usually, such finds are not so much trouble.